TJ Galda of Electronic Arts shows off some of the latest tools and toys behind animated movie production, and how they are making their way into games. From Pecha Kucha Vancouver, Volume 9.
2009-12-15
Pecha Kucha: Tom Pedriks
Tom Pedriks, Creative Director at Haymaker, presents some of the funniest hockey branding you are ever likely to see, at Pecha Kucha Vancouver, Volume 9.
2009-12-12
2009-12-11
Pecha Kucha: 2010 Design Team
A moving tribute to Leo Obstbaum, Design Director for the Vancouver 2010 Olympic Games, who passed away unexpectedly last August. Sounds like he was an amazing guy and is much missed by those who knew him.
2009-12-07
2009-11-30
2009-11-20
BC Demo Day II: 2010 Showcase
Everything you ever wanted to know about the 2010 Digital Media Showcase, from BC Demo Day II.
2009-11-16
BC Demo Day II
The 2010 Showcase and Service initiative is by far the most ambitious product innovation through collaboration project ever conceived to promote the BC wireless and digital media industry to the world. On October 22, several participating companies took the stage for 3 minutes each (give or take) to showcase their most innovative applications or services.
We'll post videos of several of those presentations over the next few days.
We'll post videos of several of those presentations over the next few days.
2009-10-04
ConQuer Mobile at MoMoVan
Angela Robert, founder & CEO of Conquer Mobile gives an overview of how they develop new projects, including iPhone applications.
2009-10-01
Xomo at MoMoVan
Ben West, Co-founder of Xomo Digital (or Experiences On Mobile), talks about their VanJazzFest app that provided scheduling, artist profiles, details on performances, and links to sample music. They are at it again for Vancouver International Film Festival (VIFF) and are working hard on their contribution to the 2010 Showcase & Service initiative.
From Mobile Monday Vancouver, September 14, 2009.
From Mobile Monday Vancouver, September 14, 2009.
ANTS at MoMoVan
Colin Quon, CEO of ANTS Distributed Media presents a new take on digital signage based on ANTS' open and easily customizable digital signage platform. From MoMoVan, September 14, 2009.
2009-07-23
Multiclip Tips for Final Cut Pro
Apple announced the new version of Final Cut Studio today. There are many improvements, but it appears that most fundamental characteristics of multiclips (and their limitations) has not changed. In the video below we show some tricks to get the most out of multiclips.
Along the way we answer some questions that we get asked frequently about PluralEyes, our product that automatically synchronizes clips without the need for timecode.
For this example we shot a band with three cameras and a separate audio recorder. We've captured the clips and put them all intoProRes 422 at 1280x720 30 fps. They could be a different format, but they all need to be the same for a multiclip.
To start editing we first make a sequence called pluraleyes and arrange the clips onto the timeline. Each camera goes on a separate track and the audio goes on its own track.
We start PluralEyes. (It's a standalone application in the Applications folder.) We press the Sync button. After a minute we've got a sequence with everything in sync. So right away we have the answer to the first two questions: we see that having cameras turned on and off is no problem, and having a separate audio track works just fine.
Multiclips will take a couple of extra steps, but it will be worth it. Final Cut Pro is a bit fussy about multiclips but once you've set them up they work great.
First we notice that PluralEyes says it couldn't make a multiclip because of the audio-only track. But even if it could you wouldn't like the result. Final Cut puts every clip into a separate angle. We have three cameras so you would expect three angles, but Final Cut would give you 17 angles, one for each clip. This is not very useful.
So here's what we do. We're going to export the tracks as separate movies and make a multiclip from those. It's very easy. In the pluraleyes output sequence, make only the first video track visible and mute all the other audio.Option-click is a quick way to do this.
Nowctrl-click on the sequence in the Browser and choose Export > QuickTime Movie. Use the "Current Settings" and make sure the check box for Make Movie Self-Contained is *not* checked. We'll name the movie for the track it came from and click Save.
This makes a QuickTime reference movie. It only takes a few seconds and we don't have to worry about using up disk space because the movie just has references to the original clips and so is much smaller than they are.
Do this for each of the three camera tracks. We could do it with the audio track too, but we have other plans for that. We now import the reference movies back into Final Cut. We're going to put them into a sequence called pluraleyes. We'll reuse the existing sequence with that name. Put them on the tracks they came from and make sure they are all lined up at the beginning of the timeline. That will keep everything in sync.
We now go back to the PluralEyes application and press the Multiclip button. This looks at the clips in the sequence called pluraleyes and makes a multiclip from them, using their positions to determine the timing within the multiclip.
We now have a multiclip with just three angles and all the clips synced up. There will be times when a particular angle is blank when the camera was turned off, which is exactly what you would expect.
We could just start our editing with that multiclip but we're going to do something to make our lives easier. It's nice to have a multiclip, but it's also nice to have a view that shows when the cameras are on or off. Fortunately, we can have both.
Go back to the original synced sequence. We're going to add the multiclip to this sequence. First we make room for its audio by moving our audio-only track down.Option-down-arrow is a handy way to do this. Now we add the multiclip and position it at the beginning of the timeline. The only things we want in our final production are the video from the multiclip and the high-quality audio, so we mute everything else.
Finally we double-click the multiclip to bring it up in the viewer, set the Playhead Sync to Open and start editing. As we play, we can watch the playhead in the timeline to see when the cameras are going to go on or off. That helps us make the decisions as to when to switch cameras.
That may have sounded a little complicated but it's easy after you've done it once. To summarize, we really just did three things:
Along the way we answer some questions that we get asked frequently about PluralEyes, our product that automatically synchronizes clips without the need for timecode.
- What if some of the cameras are turned on and off during the shoot? Will that still work?
- Can I have an audio-only track? Because I made a separate high-quality audio recording. (This technique is known as dual-system audio)
- How do I get multiclips to work? I want to edit while seeing all the cameras at once in a multi-angle display.
For this example we shot a band with three cameras and a separate audio recorder. We've captured the clips and put them all into
To start editing we first make a sequence called pluraleyes and arrange the clips onto the timeline. Each camera goes on a separate track and the audio goes on its own track.
We start PluralEyes. (It's a standalone application in the Applications folder.) We press the Sync button. After a minute we've got a sequence with everything in sync. So right away we have the answer to the first two questions: we see that having cameras turned on and off is no problem, and having a separate audio track works just fine.
Multiclips will take a couple of extra steps, but it will be worth it. Final Cut Pro is a bit fussy about multiclips but once you've set them up they work great.
First we notice that PluralEyes says it couldn't make a multiclip because of the audio-only track. But even if it could you wouldn't like the result. Final Cut puts every clip into a separate angle. We have three cameras so you would expect three angles, but Final Cut would give you 17 angles, one for each clip. This is not very useful.
So here's what we do. We're going to export the tracks as separate movies and make a multiclip from those. It's very easy. In the pluraleyes output sequence, make only the first video track visible and mute all the other audio.
Now
This makes a QuickTime reference movie. It only takes a few seconds and we don't have to worry about using up disk space because the movie just has references to the original clips and so is much smaller than they are.
Do this for each of the three camera tracks. We could do it with the audio track too, but we have other plans for that. We now import the reference movies back into Final Cut. We're going to put them into a sequence called pluraleyes. We'll reuse the existing sequence with that name. Put them on the tracks they came from and make sure they are all lined up at the beginning of the timeline. That will keep everything in sync.
We now go back to the PluralEyes application and press the Multiclip button. This looks at the clips in the sequence called pluraleyes and makes a multiclip from them, using their positions to determine the timing within the multiclip.
We now have a multiclip with just three angles and all the clips synced up. There will be times when a particular angle is blank when the camera was turned off, which is exactly what you would expect.
We could just start our editing with that multiclip but we're going to do something to make our lives easier. It's nice to have a multiclip, but it's also nice to have a view that shows when the cameras are on or off. Fortunately, we can have both.
Go back to the original synced sequence. We're going to add the multiclip to this sequence. First we make room for its audio by moving our audio-only track down.
Finally we double-click the multiclip to bring it up in the viewer, set the Playhead Sync to Open and start editing. As we play, we can watch the playhead in the timeline to see when the cameras are going to go on or off. That helps us make the decisions as to when to switch cameras.
That may have sounded a little complicated but it's easy after you've done it once. To summarize, we really just did three things:
- Sync the clips (using PluralEyes)
- Export each video track to a reference movie
- Make a multiclip from the reference movies (again using PluralEyes)
2009-07-18
Synchronized Montage Serendipity
When R.E.M. released their Accelerate album last year, they posted several clips of the band performing Supernatural Superserious and asked fans to make their own music videos and post them on YouTube. There were some great efforts, but the current collection is a shambles because many have been pulled down or had their audio removed thanks to the overzealous automated copyright infringement police.
I recently got a takedown notice for my submission and promptly objected on the grounds that the copyright owners did in fact give their permission. My video has been restored but the whole incident brought the song to mind again and I thought I'd try something different with the material that R.E.M. made available.
Among the clips there were four that were live acoustic performances. I thought it would be interesting to see if PluralEyes could sync them up. The audio was pretty different, but it worked. This says something both about how robust PluralEyes is and how tight R.E.M. is as a band.
After syncing the clips I applied an ImageFlow montage generator with mostly random parameters. The result is a music video that works, thanks to some technology that gives serendipity a chance.
Update: HD version of the video available on YouTube here.
2009-07-07
Citizen Media and the 2010 Olympics
Coverage of the Olympic Games is dominated by the International Olympic Committee's (IOC) contracted rights-holder and accredited major media conglomerates. However some feel there is a role for crowdsourced documentation of both sporting events and the cultural context in which it happens.
This expert panel discusses changes, challenges, and opportunities facing grassroots media makers around the Vancouver 2010 Winter Games.
From Northern Voice 2009.
This expert panel discusses changes, challenges, and opportunities facing grassroots media makers around the Vancouver 2010 Winter Games.
From Northern Voice 2009.
2009-06-18
Pecha Kucha Vancouver: Erin Boniferro
Along with her tools for the revolution (yellow putty balls), Erin Boniferro displays her textile-inspired art works and discusses the importance of early childhood education. From Pecha Kucha Vancouver.
Pecha Kucha Vancouver: Chris Bentzen
“Hot one inch action.” From button trading expositions to bike inspired tattoos, Chris Bentzen humorously presents the idea of community to bring together people and passions in the art world. From Pecha Kucha Vancouver.
Pecha Kucha Vancouver: Dinka Pignon
Would you attend a dinner with virtual guests? Or be taken to a hospital where the disease and cure are both art? Dinka Pignon presents VIVO, a not for profit organization, as having evolved beyond just video production. From Pecha Kucha Vancouver.
2009-06-09
DSLR Dual-System Audio: The 99.9% Solution
[Update 2010-02-08: There is an update to this topic with an alternative approach here.]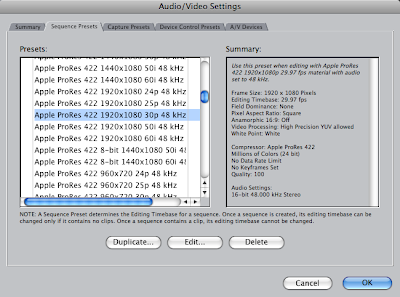

What is dual-system audio?
Dual-system audio is one name for the technique of recording audio and video on separate devices, and then combining them in post-production. Since the quality of built-in mics and audio systems of cameras are generally not nearly as good as the video, dual-system is a convenient way to get high-quality sound. It is particularly effective for video coming from a DSLR like the wildly popular Canon 5D Mark II.
The price to pay for these benefits is a small one: you need to synchronize the audio and video in post-production. This can be done manually or automatically using our PluralEyes product.
The problem with Final Cut Pro
Many non-traditional cameras shoot video at 30 fps instead of the more usual (in some parts of the world) NTSC rate of 29.97 frames per second (fps). If you are using Final Cut Pro with such video there is one quirk that you need to be aware of. This has been discussed in recent blog postings (see, for example the comment at 9:45 of the Zacuto video here). The quirk has come to be known as the 99.9% problem: when audio is combined with 30 fps video, the audio speed (sometimes) needs to be adjusted by the NTSC factor of 99.9% (actually 1000/1001).
Fortunately there is a simple fix for this: use an Easy Setup for 30 fps. Details below, but first some background.
Background
Video from a DSLR and other still cameras is typically recorded with a frame rate of 30 fps. If you do a lot of work with NTSC video, your default settings in Final Cut might be something like HDV 1080p30 which has a framerate of 29.97 fps. When you work with 30 fps material, you might expect that ensuring that the sequence frame rate is 30 (and not 29.97) would be enough to make things work. But what happens is that when you add an audio track to the timeline, Final Cut retains some memory of the NTSC settings and applies an NTSC adjustment to the playback speed of the audio. This seems like a bug to me--I can't imagine any situation where I would want it to do this. Fortunately you can prevent this from happening by using the right kind of Easy Setup.
The pre-packaged, easy way
If you are editing video from a Canon 5D Mark II using the ProRes 422 codec, you can download the Easy Setup here and copy it to /Library/Application Support/Final Cut Pro System Support/Custom Settings. Choose this Easy Setup, restart Final Cut and all should be good. Note that if you had already created a sequence before performing those steps, you need to throw it out and re-create it from scratch.
If you are using a different kind of video that is using a non-NTSC framerate, the following takes you through the steps to create the Easy Setup. You'll need to make changes that are appropriate for your video format, but they should be obvious.
The do it yourself way
- Create a suitable Easy Setup
- Select that Easy Setup
- Re-start Final Cut Pro
- Create a new project and work with that.
Here are the details on how to create an Easy Setup for video from a Canon 5D Mark II that has been transcoded to ProRes 422 (which seems to be the consensus recommendation for how to edit 5DMKII video, at least, if you've got FCP 6). We're creating a new Easy Setup because none of the ones that ships with Final Cut is suitable. The following video tutorial shows both the problem and how to fix it. [Note: In the tutorial I suggest changing the audio sample rate to 44.1 kHz. It makes more sense to use the sample rate of your externally recorded audio, which is probably 48 kHz.]
Go to the menu item Final Cut Pro > Audio/Video Settings... > Sequence Presets. Pick Apple ProRes 422 30p 48kHz, because it's close to what we want to end up with, and choose Duplicate...

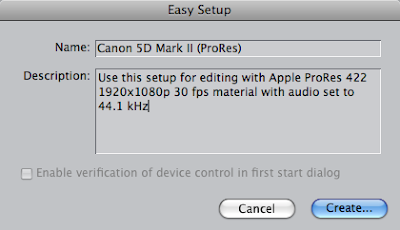
Type in something appropriate for the name and description as shown and make two changes. The important one is to change the Editing Timebase to 30 fps. Set the Audio Settings > Rate to the rate of your externally recorded audio (probably 48 kHz).
Choose OK and then go to the Summary tab and choose Create Easy Setup.

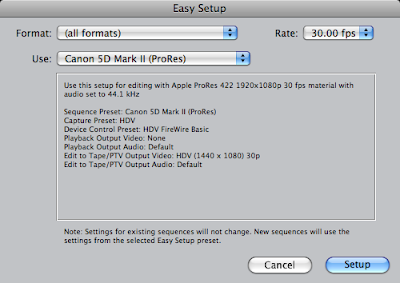
Type in an appropriate description,

and select this Easy Setup.

Restart Final Cut Pro. For any newly created sequences, the audio and video will play at the same rate with no need for a 99.9% speed change.
Update 2010-02-05: Modified to make it clear that if you have a sequence created before you applied the right Easy Setup and re-started FCP, you also need to re-create that sequence from scratch. The speed problem occurs when the sequence is created and any frame rate mismatch will be baked in and won't change, even if you change the Easy Setup.
Update 2010-02-08: Modified to make the cleaning up step even more thorough. The speed problem actually gets baked in when you import your audio into the project. So you need to start a new project after doing the Easy Setup. I'm working on a whole new blog post about this.
2009-06-07
Deleting Custom Settings in Final Cut Pro
This is the first of a couple of technical notes about video editing.
If you edit with Final Cut Pro, you may end up creating some custom Sequence Presets and custom Easy Setups. And chances are you will want to delete some or all of the ones you've created. This is easy to do, but finding out how is surprisingly hard.
Here's how. Note that step #3 will cause all your preferences to be forgotten and it will be like starting Final Cut after a fresh install. If that sounds too awful, then don't do it and just live with the extra customizations showing up in your list.
1. Exit Final Cut Pro.
2. Delete any custom Easy Setups here:
/Library/Application Support/Final Cut Pro System Support/Custom Settings
3. Trash your Final Cut Pro preferences by deleting the following files.
~/Library/Preferences/com.apple.FinalCutPro.plist
~/Library/Preferences/Final Cut Pro User Data/Final Cut Pro 6.0 Prefs
~/Library/Preferences/Final Cut Pro User Data/Final Cut Pro Obj Cache
~/Library/Preferences/Final Cut Pro User Data/Final Cut Pro Prof Cache
4. Empty the Trash.
5. Restart Final Cut Pro.
2009-06-05
Pecha Kucha Vancouver: Marian Bantjes
Graphic artist Marian Bantjes presents a wonderful, exhilarating array of art pieces inspired by her dentist, cake and love gone right and wrong. From Pecha Kucha Vancouver.
2009-06-02
Pecha Kucha Vancouver: Jeff Hamada
Jeff Hamada gives a very funny retrospective of his artistic development from promising hockey and dinosaur drawings as a child, through a low point (ceramics) and then numerous design successes and the popular booooooom.com site. From Pecha Kucha Vancouver.
PKVN06: Jeff Hamada from Singular Software on Vimeo.
PKVN06: Jeff Hamada from Singular Software on Vimeo.
2009-05-24
Pecha Kucha Vancouver: Jesse Savath
"If you want something in life you just have to try it." Director, photographer and founder of the film collective Salazar, Jesse Savath illustrates that aphorism by the example of his own evolution. The starting point was a complete lack of ideas. From there he shaped a successful career doing what he loves in a series of steps that often involved just showing up and figuring it out when you get there. From Pecha Kucha Vancouver.
2009-05-23
Pecha Kucha Vancouver: Matthew Miyagawa and Vince Chan
Any presentation that ties together environmental biology, shirt design, cross-country sneaker tours and food blogging has got to be interesting. Matthew Miyagawa and Vince Chan, the founders of Finale Design, survey their wide-ranging creative projects at Pecha Kucha Vancouver.
Technical note: The audio quality is not great. (Sorry!) You may need to listen with headphones.
Technical note: The audio quality is not great. (Sorry!) You may need to listen with headphones.
2009-05-21
Pecha Kucha Vancouver: Rex Weyler
Many years ago, Rex Weyler had to choose between going to Vietnam, a jail in Texas or Vancouver. Vancouver won. He tells the story of how he pursued a career as journalist and photographer, and how his enduring interest in the way environments shape who we are led him to become one of the founders of Greenpeace International. From Pecha Kucha Night Vancouver.
2009-05-18
Pecha Kucha Vancouver: Alex Beim
Alex Beim has created some of the most inventive interactive amusements for public events that I've ever seen. He shows some of his projects and how they came about in this presentation at Pecha Kucha Vancouver.
2009-05-16
Pecha Kucha Vancouver: Oliver Lang
What does culture produce at a moment of change in our cities? How should a designer respond to the challenge of an urban population that is going to double over the next 30 years to 6 billion people? Oliver Lang talks about some of the concepts and projects his company is working on. From Pecha Kucha Night Vancouver #5.
Technical note: The audio quality is not great. (Sorry!) You may need to listen with headphones.
Technical note: The audio quality is not great. (Sorry!) You may need to listen with headphones.
2009-04-16
NASA Confirms Feasibility of 25 Hour Day
You may think I'm kidding about the 25 hour day concept. OK, maybe NASA has more credibility than I do? This is not a new story, but for some reason we still haven't adopted the 25 hour day, so it's worth pointing out (again) that it can be done.
2009-04-14
Pecha Kucha Vancouver: Jeff Topham
In this moving presentation, Jeff Topham reflects on his childhood growing up in Liberia through a serious of pictures taken by his dad. He returned there a few years ago to find a country that has been through terrible times and shares his own pictures of that journey. From Pecha Kucha Night Vancouver Volume #5.
2009-04-10
Rock 'n' Roll Photo
Using several well-chosen photos of rock 'n' roll stars as a backdrop, Dave Olson finds out from noted Vancouver photographers Bev Davies and Kris Krüg how they are permitted access (or not), how they work with the musicians (or not) and what it takes to get that iconic, memorable photo. From Northern Voice 2009.
It takes a minute or two for the video to settle down. Stick with it, it's worth it!
Technical Notes
The post-production was an edit of four synchronized clips:
It's always an interesting challenge to figure out how to best lay out slides with room shots and B-roll footage generally. Particularly when the slides are such a key part of the presentation. After starting to cut back and forth a zillion times I realized it was going to be as painful to watch as it was to edit. In a forehead slapping moment I realized that camera A on the slides was pretty much locked down the whole time and I could just put the video from the two cameras side by side. Camera B footage is dark and rough, but it gives a nice feel for the room without intruding on the photos. And it saved the day when the camera A footage ran out.
Camera A had a lot of trouble with white balance and at one point near the beginning appeared to kick into night vision mode! Once it settled down though I was able to use a constant color correction to get a decent view of the photos.
iPod-compatible video. (Right click to download)
Listen to the audio. (Right click to download)
It takes a minute or two for the video to settle down. Stick with it, it's worth it!
Technical Notes
The post-production was an edit of four synchronized clips:
- camera A: anamorphic DV camcorder on a tripod, one long clip that ends prematurely when the tape runs out (have I ever mentioned that I hate tape?)
- camera B: handheld digital still camera, two clips with a break in between for a memory card swap
- audio: Olympus WS210s voice recorder just thrown on a table somewhere
It's always an interesting challenge to figure out how to best lay out slides with room shots and B-roll footage generally. Particularly when the slides are such a key part of the presentation. After starting to cut back and forth a zillion times I realized it was going to be as painful to watch as it was to edit. In a forehead slapping moment I realized that camera A on the slides was pretty much locked down the whole time and I could just put the video from the two cameras side by side. Camera B footage is dark and rough, but it gives a nice feel for the room without intruding on the photos. And it saved the day when the camera A footage ran out.
Camera A had a lot of trouble with white balance and at one point near the beginning appeared to kick into night vision mode! Once it settled down though I was able to use a constant color correction to get a decent view of the photos.
iPod-compatible video. (Right click to download)
Listen to the audio. (Right click to download)
2009-04-09
Pecha Kucha Vancouver: Shawna Cox
"Canadian Film Girl" Shawna Cox talks about juggling multiple film projects including her quest to film the Dakar Rally, and why it is more than "just an event" to her. From Pecha Kucha Night Vancouver, volume #5.
PKVN05: Shawna Cox from Singular Software on Vimeo.
2009-04-04
Pecha Kucha Vancouver: Dolly Hopkins
The Public Dreams Society is the producer of two participatory events, Illuminares Lantern Procession and Parade of the Lost Souls, which have been huge successes as seen in the creative artistic expression by a broad range of people. Dolly Hopkins explains the ideas behind them in this presentation at Pecha Kucha Vancouver volume #5.
2009-04-02
Pecha Kucha Vancouver: Duane Elverum
Duane Elverum of Emily Carr University talks about radical course experiments to rethink what leadership means in the 21st century. From Pecha Kucha Night Vancouver volume #5.
Listen to the audio. (Right-click to download)
Listen to the audio. (Right-click to download)
2009-04-01
Pecha Kucha Vancouver: Kelly Deck
Kelly Deck tells how her passion for interior design and a philosophy of simplicity and beauty led to the creation of a boutique and design studio, a television series, a newspaper column and most recently a residential design firm. From Pecha Kucha Night Vancouver, volume #5.
2009-03-31
Pecha Kucha Vancouver: Kris Krüg
Kris Krüg kicks off Pecha Kucha Night Vancouver volume #5 with his take on where open media, open culture and open software standards are taking us. His themes are particularly close to our hearts here at Singular Productions. Favorite quotes: "If you don't stick it on the internet, it didn't actually happen," and, "Our biggest danger isn't piracy or having our work stolen, it's actually obscurity and being irrelevant."
2009-03-27
The Levelator chosen as Friday Favorite
The Unofficial Apple Weblog has chosen The Levelator as their Friday Favorite. This app is the "friend to podcasters everywhere" that my company, Singular Software, developed in partnership with the Conversations Network. It levels out the audio in spoken word recordings by performing "a small miracle". For free! Thanks TUAW, for encouraging podcasters to make the lives of everyone's ears a little better.
2009-03-25
Social Media Mores for the Modern Couple
How does your online life affect the relationship with your significant other in real life? Maybe you communicate to your wife in a blog post because it's easier than in person? Do you have an agreement with your SO about what is or is not within bounds?
Two couples who have been online for years talk about how they manage it in this funny and thoughtful session from Northern Voice 2009. Putting it all out there for us are Kate Trgovac and Rosemary Rowe, and Airdrie and Derek K. Miller.
Update: Can't believe I didn't mention the very capable moderation by and contributions from Julie Szabo. (Sorry Julie!)
[Note: The audio is a bit rough at the beginning but it gets better a few minutes in.]
2009-03-24
Behind the Scenes with "Sock Puppets, Spammers and Trolls"
The recording and editing of this session followed the procedure discussed here. Very straightforward. It is nice to get such acceptable results from such a simple setup.
Behind the Scenes with "Where Do I Live Online?"
This session was pretty simple: a single camera with an on-camera mic and an Olympus WS210S tossed on a table in front of the presenters. I cleaned up the Olympus audio in the "usual" way. It was good enough that I completely replaced the camera audio with it after synchronizing.
Sock Puppets, Spammers and Trolls
How should you handle angry comments on your blog? How can you recognize the various types of undesirable commenters named in the title? This panel discussion from Northern Voice 2009 has the answers. There are some new insights into the mind of the commenter and suggestions on how to respond (or not respond) from people who have been there. Rebecca Bollwitt and David Eaves lead the way.
Listen to the audio here. (Right-click to download)
[Update: Some technical info on the recording/editing process is here.]
Listen to the audio here. (Right-click to download)
[Update: Some technical info on the recording/editing process is here.]
2009-03-22
Where Do I Live Online?
Sure, you've heard of blogging and twittering, but there are many other places where people have a presence online. How do they choose to appear: anonymously, pseudonymously or as themselves? From Facebook to knitting communities to fan fiction, this very interactive session covers it all. The panelists are Lauren Wood, Kim Adamson-Sharpe, Hilary Genders, and Tim Bray. From Northern Voice 2009.
Listen to the audio. (Right-click to download.)
[Update: Some technical notes on the recording/editing process are here.]
Listen to the audio. (Right-click to download.)
[Update: Some technical notes on the recording/editing process are here.]
Behind the Scenes with "Bring Your Blog to Life"
When you show people recordings of themselves, they are inevitably appalled and overly critical of their performance. I am no exception. When it came time to edit my presentation from Northern Voice, I was not happy with the number of um's and ah's. I vowed to edit them all out. The ostensible reason is that it would make the presentation more pleasant to listen to, but it was probably mostly just vanity.
But there was some technical interest too. How to edit um's out of video was asked during my presentation and after some fumbling, we came up with the answer: paste some room tone over the um's. Although I have done tons of this kind of editing for audio, video is different: you can't just cut it out or the video will have a visual discontinuity that would be jarring.
So I took my own advice, looked for a quiet passage in the audio and saved it out to a separate file. Whenever I encountered an um, I would copy a section of the appropriate length from this file and pasted it over the um. By doing a little crossfade at the edges of the paste, the edit was audibly undetectable. And since your mouth doesn't move much when you um, you don't really notice that the sound is missing.
The concept is straightforward but the procedure quickly becomes very tedious. I used Adobe Audition for the edits and wrote a script to automate the process. Audition's scripting capabilities were too limited for the job so I used an absolutely stunningly wonderful scripting program called AutoHotkey. The end result was very nice. You select the region of audio containing the um, press a button and the rest happens automatically. It even leaves the cursor in position to play some preroll so you can hear how the edit sounds in context.
The script proved so easy to use that I also cleaned up breathing sounds and other intrusive mouth noises. I will post the script to our website eventually, but if you're in a hurry drop me a note and I'll send it to you.
Most of the rest of the time on the audio was spent cleaning up the interference on the wireless mics. Ugh. And I brought the audience Q&A sound up so you could hear it better. One test viewer said it was still too hard to hear, so I put brief summaries of what the audience was saying in text in the lower third.
2009-03-19
Behind the Scenes with "Coping Digitally"
Coping Digitally was one of the most straightforward videos from Northern Voice so far: a single camera with on-camera audio. The audio came from a camera-mounted shotgun mic. The voices sound distant, but they are intelligible.
I couldn't resist fiddling with the sound and it made a big improvement. This was all done in Adobe Audition, but I am getting better with Soundtrack Pro and may do the next project with that.
Here are the steps:
I couldn't resist fiddling with the sound and it made a big improvement. This was all done in Adobe Audition, but I am getting better with Soundtrack Pro and may do the next project with that.
Here are the steps:
- Noise reduction: Fortunately there was a quiet passage to use for the noise profile. That was a bit lucky though. Note to videographers: always record more than you think you need and make sure you get some "room tone" (background sound when no one is speaking). Noise reduction can be tricky but in this case it worked out well without a lot of fiddling.
- EQ: The voices sounded very thin and distant. I boosted a region around 200Hz by about 6dB to fatten them up a bit.
- Limiting: There were lots of door slams, microphone bumps, etc. The Levelator (see step 5) can cope with this, but some of the spikes were pretty extreme so I helped it out by doing a limiting step. I find that if I use the "gather statistics" option in Audition to limit no more than .05% of the samples, I can boost the gain a fair amount and it is inaudible.
- Bandpass filter: A technique I picked up from working with the Conversations Network is to routinely bandpass filter spoken word content between 80Hz-10KHz. There's no useful information outside that band and it just cleans things up a bit for downstream processing.
- Levelator: Last step was to apply The Levelator. It did a good job of evening out the quite varied levels of the presenters and making the audience Q&A audible.
2009-03-17
Coping Digitally
Mental illness is increasingly acknowledged openly and publicly. This panel talks about how social media is playing a new role in the discussion. Airdrie Miller, Isabella Mori and Tod Maffin tell their stories in this session from Northern Voice 2009.
Listen to the audio. (Right-click to download.)
Listen to the audio. (Right-click to download.)
2009-03-15
Bring Your Blog to Life (complete)
How do you get started creating audio and video for the web? Here is my talk from Northern Voice 2009 where I answer that question. Aimed at the beginner, it covers the end-to-end process of choosing equipment, recording, editing and publishing. I made very specific recommendations for each step so that someone who wants to try their hand at new media would have a good starting point. The audience knew lots of things that I didn't and made some great contributions.
Sorry about the noise in the audio. The wireless mics were acting up.
Also available: slides from the presentation and a list of links to everything mentioned.
Sorry about the noise in the audio. The wireless mics were acting up.
Also available: slides from the presentation and a list of links to everything mentioned.
Note: This talk is an hour long. I will split it up into shorter pieces and make those available "soon".
iPod-compatible video. (Right-click to download.)
Listen to the audio. (Right-click to download.)
[Update: Some technical notes on the not-so-straightforward recording/editing process are here.]
2009-03-10
Launch Party Vancouver 6
More startup action in Vancouver. Six companies showed their stuff at Launch Party 6 and there was a lively crowd at Steamworks in Gastown to mix it up and party. Here's a two minute video to give you the flavor of the event. Be sure to watch for the action-figure trophy prizes near the end.
Listen to the audio. (Right click to download.)
Listen to the audio. (Right click to download.)
2009-03-07
Twit This, Timbuktu
The world is coming to Vancouver for the 2010 Olympics. What role can social media play to best put forward the face of the city? And what should that face be exactly? Who else has done this well? Michael Klassen gets lots of ideas from the audience in this session from Northern Voice 2009.
Listen to the audio. (Right-click to download.)
Listen to the audio. (Right-click to download.)
Behind the Scenes with "Death of Advertising"
This recording had two audio sources: a clip-on wireless mic and a standalone Zoom H2 recorder using its built-in microphones. As was too often the case in this venue, there was a lot of interference on the wireless mic. After synchronizing I opted to go solely with the Zoom recording. It got started late, so there is the somewhat weird transition at about 30 seconds from one mic to the other.
The Zoom recording sounds pretty distant but it's intelligible. It also did a pretty good job of picking up the audience discussion. The Levelator did its thing to balance the levels.
Lessons Learned
1. It's always good to have a backup recording.
2. Build a Faraday cage around the room to kill electrical interference?
3. Well, more practically, use a clip-on mic into a portable audio recorder that the presenter can stick into his/her pocket. We will illustrate this technique in future recordings.
4. Or, have the wireless receiver really close the presenter and record into a portable recorder like the Zoom instead of directly into the camera.
2009-03-06
Death of Advertising
Is advertising dead? Chris Heuer thinks it should die, so that it can be reborn. Chris leads a discussion on what is killing advertising and what's coming next. From Northern Voice 2009.
Behind the Scenes with "Letters from Russia"
This was a very simple one-camera setup with audio being recorded directly onto the camera from a mic clipped onto the presenter. It was all great except for a wee bit of clipping when the presenter was too loud for the mic settings. I improved it a little by using the Clip Restoration feature in Adobe Audition, but that rarely helps much and it didn't do a lot in this case. Other than that and normalizing the audio to -18dB RMS, little else was needed.
Letters from Russia
Dave Olson talks about the sources of inspiration, the creative process and publishing your work in this lively mixed-media presentation. Watch this and you'll understand why Dave has been dubbed a "local cultural artifact". From Northern Voice 2009. Note: Contains adult language.
Listen to the audio. (Right click to download.)
Listen to the audio. (Right click to download.)
2009-03-04
Behind the Scenes with "Streaming Media..."
Here's the technical background on the second video from Northern Voice 2009. This one was straightforward: a single HD camera with audio from the on-camera mic. That made it simple, but the audio is pretty rough. It had a nasty whine at 2950Hz (where the heck did that come from?) which I removed with a notch filter using the increasingly loved Adobe Audition. Other than that I did a mostly ineffective attempt at noise reduction, normalized the RMS levels and sent it on its way back into Final Cut Pro for rendering.
The goal here was to get it out quickly rather than spend a lot of time optimizing the quality.
The goal here was to get it out quickly rather than spend a lot of time optimizing the quality.
Streaming Media Hits the Big Time
Did you know you can stream video live from your phone over the internet? Roland Tanglao leads a discussion that reveals all about how to do it, what works and what doesn't (yet). From Northern Voice 2009.
Listen to the audio here. (Right click to download.)
Listen to the audio here. (Right click to download.)
2009-02-28
Behind the Scenes with "Teh Funny"
Part of the reason for recording and posting the sessions from Northern Voice is to learn and share the experience of doing event videos, which I hope will encourage others to do more of the same. Here's the short story behind the Teh Funny. More extensive details are below.
The video was shot by three cameras, one of which was a cell phone camera. Audio was recorded on a standalone audio recorder. Slides were recorded directly from the presenter's laptop. These five recording sources were synchronized with our software and then edited in Final Cut Pro.
There's a lot more to it as I'll now explain. This is pretty detailed technical info, so hide your eyes if you find it too scary.
Slides
The slides were recorded onto a T61 laptop using an Epiphan VGA2USB and VirtualDub. I used the ffvfw MPEG-4 codec and recorded audio from the laptop built-in mics. That's poor quality audio but it was only needed for synchronization purposes later so it was enough. Unfortunately the quality of the video was not good. The Epiphan box does a good job about 90% of the time, but this was not one of those times. So I asked the presenter for his slides. They were in Apple's Keynote which has an easy way to export all the slides to individual images: look under Share > Export... I did use the Epiphan recording, but just to know where to place the slide images in the timeline.
Video
I recorded video from the back of the room using a Canon XH A1. It was equipped with a Rode shotgun mic for backup audio and to pick up some room tone and audience sounds. Another attendee recorded B-roll footage using a monopod at the front of the hall. (You can see her on the right in some of the early frames.) A third attendee posted live video to Qik which was downloaded later.
Audio
The primary audio was recorded using a wireless lavalier mic into a Zoom H4. Secondary audio was to come from the camera-mounted shotgun mic. These would be mixed after synchronization.
Post-Production
I dumped everything into Final Cut Pro and used our software to automatically synchronize it. It worked like a charm. The Zoom audio had a bit of drift but the software corrected for that and it was perfectly synced with the shotgun audio so they could be mixed. Normally at this point I would throw both audio tracks into The Levelator and then do the editing.
That would be the end of the story, but there was a problem. I'm fussy about the quality of the audio and I've had excellent results using this setup, but in this case the primary audio recording was beyond bad. First of all, the lavalier mic on the presenter's shirt kind of flopped over, so there was lots of bumps and clothing noise. Second there was electrical interference with the wireless system. I'd tested it all beforehand, but once the room was filled with dozens of laptops and all the AV systems fired up, something caused nasty hissing and zapping sounds.
I knew some of this was happening during the shoot, but I couldn't bring myself to interrupt the presenter to tinker with everything. So I decided to fix it as best as possible in post.
It was a nightmare. I spent a loooong time in Adobe Audition cleaning it up and I think I used every trick that program has to offer. There were three different noise profiles used at various times, lots of gating, some EQ, envelope shaping and the healing brush. The more I used Audition the more I appreciated what it can do. Not only are there lots of tools, but they have implemented the algorithms very well.
In the end though, it's garbage in and just slightly less smelly garbage out. After mixing in much more camera audio than was originally intended, it was done. The best that can be said about it is that the speaker is intelligible and it doesn't actually make your ears bleed.
Compared to the audio, the rest of the editing process was a breeze.
Lessons Learned
1. Watch where you clip on those lavalier mics. Get it as close as possible to the mouth but at all costs keep it from rubbing or bumping clothing or anything else.
2. Wireless mics can work well but if you have any reasonable alternative, go for it. In other sessions at this conference, we used an Olympus portable voice recorder with excellent results. With hindsight I wished I had fed the wireless audio into the other audio track on the camera instead of the Zoom and instead just propped up the Zoom on the lectern to record with its own mics (as backup audio).
3. If people are recording to tape, just grab the tapes from them at the end of the day. We ended up having to do a complicated compress-upload-download cycle that slowed things down a lot.
4. It's a good idea to have a USB key handy to grab a copy of the slides from the presenter right after the presentation. As much as I love the Epiphan box, the original slides are better quality and it can make a noticeable difference even at web resolutions.
5. By all means, go with multicamera/multiaudio recording. If you ignore my whining about the audio quality problems, you'll see that the process was amazingly simple despite the number of variables involved. By doing synchronization in post, the cameras and audio don't need to be connected to each other during recording. And by having a precise sync on the audio, you can get a pleasing mix of presenter and room audio.
Teh Funny
Rob Cottingham of Social Signal delivered a hilarious keynote at Northern Voice 2009. Here is the much-requested full length recording of that presentation, in glorious multicamera goodness.
This is the first video to be released in the grand experiment of trying to make all sessions from Northern Voice available online. It was also a great use case for our company's automatic synchronization software which is currently in beta. The technical details are described here.
This is the first video to be released in the grand experiment of trying to make all sessions from Northern Voice available online. It was also a great use case for our company's automatic synchronization software which is currently in beta. The technical details are described here.
2009-02-24
Slides from my Northern Voice presentation
Here are the slides from my presentation at Northern Voice 2009. Video will be posted "soon". Links for everything mentioned in the talk are here.
2009-02-23
Northern Voice 2009 Recordings
Some videos from Northern Voice 2009 are already available (no thanks to me--yet). Several others will be trickling out at a steady rate as we crunch through the material. The hard part is getting everything off people's cameras and into a common location. Unfortunately the files are a little too big (e.g., tens of gigabytes) to be sending through e-mail.
For those of you who just can't wait, there are several Qik videos here and more here.
Stewart Butterfield's keynote is below, thanks to James Cogan.
Stewart Butterfield Keynote - Northern Voice 2009 on Video.ca
For those of you who just can't wait, there are several Qik videos here and more here.
Stewart Butterfield's keynote is below, thanks to James Cogan.
Stewart Butterfield Keynote - Northern Voice 2009 on Video.ca
2009-02-19
Links for Northern Voice Presentaton
[Update 2009-02-27] What looks like the definitive guide to recording phone conversations has been posted here.
Added links for embeddable audio players.[]
I am presenting at Northern Voice 2009 tomorrow. The talk is titled How to Bring Your Blog to Life and is about getting started with audio and video. In this post I gather together all the links to the sites referred to in that presentation.
General Info
Wikipedia entry for podcast
Example Sites
Doug Kaye's blog
Apple Store Opening video
David Howell's short films for the Web
NowPublic crowd powered media
Vancouver Weekly Underground Review Podcast
YouTube unbox video example
Gear
Olympus WS-210 voice recorder
Zoom H4 digital audio recorder
Basic USB mic at Best Buy
BlueMic Snowball USB microphone at Long & McQuade
Shure SM58 at Tom Lee Music
Flip Video site
Velbon C600 at London Drugs
Manfrotto Tripod Kit at B&H Photo
Flourescent light kit at Broadway Camera
Green screen supplies at TubeTape
USB headset at Best Buy
Recording from two USB mics on the Mac
Camera Review Sites
Still cameras: dpreview.com
Camcorders: camcorderinfo.com
Software
Pamela for Mac Skype recording
Audio Hijack Pro
Total Recorder for Window Skype (and other recording)
MX Skype Recorder (free)
Phone Recording
Cheapie phone recorder at The Source
JK Audio
TalkShoe
Screencast Software
Camtasia
SnapZ Pro X
ScreenFlow
Audio Editing
The Levelator
Audacity
GarageBand
GoldWave
Adobe Audition
Soundtrack Pro
Windows Movie Maker
iMovie
Pinnacle Studio
Final Cut Express
Sony Vegas Pro
Resources
iStockPhoto
Voices.com
Lynda.com
MPEG StreamClip
music.download.com
17 Places to Find PodSafe Music
99Designs
Soundsnap (sound effects)
MP3
LAME for Audacity
ID3-TagIT
Hosting and Publishing
Blip.tv
libsyn.com
SlideShare
Resources for WordPress podcasting: PodPress.org
FeedBurner
Embeddable Audio Players
Yahoo media player
Wordpress plugin (MP3 only)
Tutorial: using the Wordpress plugin in non-Wordpress pages
Podcast Directories
iTunes
SpokenWord.org
Podcast Pickle.
BluBrry
Podcast Alley
Odeo
Coding Resources
RentACoder
oDesk
Elance
2009-02-18
Embedding F4V Files in Keynote
I just ran into (and solved) a little problem. I'm preparing a presentation for Northern Voice 2009 and am using Keynote for my slides instead of boring old PowerPoint. My talk is about producing audio and video for the Web and I have several F4V videos that I want to include in my slides. (F4V is Adobe's Flash wrapper for H.264-encoded video.)
Keynote lets you easily embed a QuickTime movie, but what about F4V? After many failed attempts here's what works. Fortunately, it's simple.
Keynote lets you easily embed a QuickTime movie, but what about F4V? After many failed attempts here's what works. Fortunately, it's simple.
- Download and install the Perian drivers so that QuickTime can play Flash video.
- Select the video file to be embedded, Ctrl-click and choose "Get Info".
- Set "Open with:" to "QuickTime Player".
- Change the extension on the file from .f4v to .mov.
- Drag and drop the file into Keynote.
2009-02-16
PNWS: Gerry Chan and The Future of Wireless
Phones made from bamboo, networks of nano robots, RFID biological implants and more. Gerry Chan of the Wireless Research Centre Canada talks about The Future of Wireless in this keynote from the Pacific Northwest Wireless Summit, Jan. 19, 2009.
2009-02-12
SpokenWord.org goes live
 SpokenWord.org is the latest creation from the indefatigable Doug Kaye, founder of IT Conversations and the Conversations Network. Just out of beta, this new site is a must for anyone who loves podcasts and other Web media content. It provides a number of ways to find, manage and share spoken-word recordings. There's been a lively discussion during development among many enthusiastic alpha and beta testers and Doug has boiled all the ideas down to a site that hangs together nicely. Recommended.
2009-02-02
Northern Voice 2009
I'll be giving a presentation at Northern Voice this year. The title is Bringing Your Blog to Life and it's all about getting going with audio and video in your blogging world. (Friday, Feb. 20, 1:30PM)
In addition, I am organizing several of the participants to record as much of Northern Voice as we can. It's a fun and useful conference and deserves to reach a broader audience than its small venue can support. There will be more information about this on the Northern Voice wiki "soon". Watch for videos from the conference to appear on this blog and elsewhere.

Update: The manifesto describing the recording project has now been posted here.
In addition, I am organizing several of the participants to record as much of Northern Voice as we can. It's a fun and useful conference and deserves to reach a broader audience than its small venue can support. There will be more information about this on the Northern Voice wiki "soon". Watch for videos from the conference to appear on this blog and elsewhere.
Update: The manifesto describing the recording project has now been posted here.
2009-01-28
PNWS: Best Keynote (Highlights)
Thomas Huseby is Managing Partner at SeaPoint Ventures, a VC firm based in Seattle. His presentation at the Pacific Northwest Wireless Summit was voted as Best Keynote by the attendees. Click the image below to see some highlights from that presentation.
2009-01-09
MoMoVan: zinepal.com
Frank Worsley from zinepal.com describes how to create custom magazines from your favorite blogs, websites or RSS feeds.
From Mobile Monday Vancouver, Nov. 3, 2008.
From Mobile Monday Vancouver, Nov. 3, 2008.
Subscribe to:
Posts (Atom)


